
How to do Website Migrations Without Losing Traffic & SEO

Website migrations are, without a doubt, one of the most daunting tasks for SEOs. Overhauling your website can lead to lost rankings, traffic loss and an overall drop in organic visibility.
However, there are times when migrating your website is inevitable. In this article, we will go into detail about website migrations, the risks involved, and what you can do to negate or minimise the risks.
What is a website migration?
A website migration is any process where the site structure, content, design, UX, and URL structures of a website are changed significantly in a manner likely to affect rankings. For instance, if you have URLs that are not search engine friendly and you have to come up with new URLs, this would count as a site migration.
Unfortunately, google’s site move documentation is not as detailed as some SEOs would like it to be and does not prominently address the risks involved if site migrations go wrong.
Types of Website Migrations
As mentioned previously, there are various types of migrations. Below we will go into detail about each:
- Domain change – This is the most common type of migration. It entails changing your domain from olddomain.com to newdomain.com
- URL changes – This is when you only change the URL structure of your website but keep your main domain. Example yourdomain.com/example-url to yourdomain.com/category/example-url
- CMS change – Different CMSs have different URL structures. For instance, Shopify URLs structures differ from WooCommerce and Magento. Therefore, when you move from one CMS to another, this is technically a site migration.
- Website redesigns – Although this might not include URL changes, changing the design of your website still counts as a migration, as it will affect how search engines view your website. If the design change involves changes to the content on the website, then there’s a chance that it will affect your website’s organic visibility.
- Merging two websites – This mainly occurs in big organizations when a new business is acquired. Merging two websites into one is more complex and requires the involvement of all stakeholders to determine which pages and/or services will be kept, and which ones will not.
Step by Step Guide on how to do website migrations
As previously mentioned, site migrations are complex and if not done in the right way, your website’s rankings and organic traffic will be adversely affected. There will always be risks associated with migrations, but following the right process will minimise the risks.
The entire process can be split into smaller sections for easier management. Once each section is complete you can move on to the next phase.
1. Crawl the current website
Before you migrate your website, it is advisable to record top traffic pages over the last 6 months. These pages should be migrated over to the new website. Oftentimes, people make the mistake of removing content and/or making extensive changes just before migrating a website. This can lead to drops in traffic and rankings.
The first step is to benchmark how your current website is performing. In particular, note how much traffic your website gets, which days the traffic peaks, and what the site’s overall health is per the SEO tools you’re using. For instance, Semrush and Ahrefs both show a site’s health based on the number of issues found during a crawl.

2. Record top traffic pages
Before you migrate your website, it is advisable to record top traffic pages over the last 6 months. These pages should be migrated over to the new website. Oftentimes, people make the mistake of removing content and/or making extensive changes just before migrating a website. This can lead to drops in traffic and rankings.
3. Crawl the new site
When the new website is ready, ask your developers to allow crawling of the staging environment. Make sure that the staging or dev site is not indexable. You can crawl it using Semrush, Ahrefs, or Screaming Frog.
Once the crawl is done, compare the site health of the dev site to that of the live site. Ideally, the dev site should be in good health and free of any major technical issues.
4. Check top performing pages from the old site have been migrated
Check the dev site for the top traffic pages. Ensure that all of them have been migrated and that their metadata and content are exactly the same as on the live site. This will minimise the risk of losing traffic or rankings.
You should also check the internal links on the dev site and make sure that they are pointing to the new URLs.
5. 301 mapping
301 mapping is the single most important step when it comes to website migrations. 301 redirects help point users and search engines to the new pages. If not implemented, search engines and users will hit a 404 page which creates a poor user experience, and search engines will eventually drop the pages from their index, and as a result, ranking signals from the pages will be lost.
When mapping the pages, you should start by mapping the top traffic pages. This can be done manually but it can be tedious for big websites. In such a scenario, you can talk to your developers to automate the redirects. This can be done by adding redirect rules that cover as many URLs as possible. Your developers should be able to get this done on the server.
6. Launch the new website
Pick a time to launch your website, preferably during low-traffic times. This can be over the weekend or late at night when there are few users on your website. Put your site on maintenance mode to inform potential users that the site will be back soon.
Before you launch your site, make sure you have a full backup of your current website. This will be vital in case something goes wrong with the migration.
7. Implement 301 redirects
Once the new site is live, you should add the 301 redirects from the old URLs to the new URLs. If you are carrying out a full domain change, make sure your home page is redirected as well. The redirects should stay in place for at least a year per google’s recommendation. However, you can keep them for longer, which is advisable if your website is large.
One common mistake most people make is redirecting all URLs to the new homepage. This is catastrophic and a leading cause of traffic and rankings loss. URLs should be redirected to a relevant URL otherwise it will register as a soft 404.
8. Add robots.txt file
You can use the directives from the old robots.txt file if the site structure is similar. However, it’s best to go through all the directives to make sure that none are blocking crawlers from vital sections of your website. Make sure that the new sitemap is added to the robots file as well.
9. Submit address change request in GSC
If you’re changing the entire domain, you should also submit a change of address request via the google search console. When you submit the request, google will aptly check if the homepage (root domain) has been redirected to the new domain.
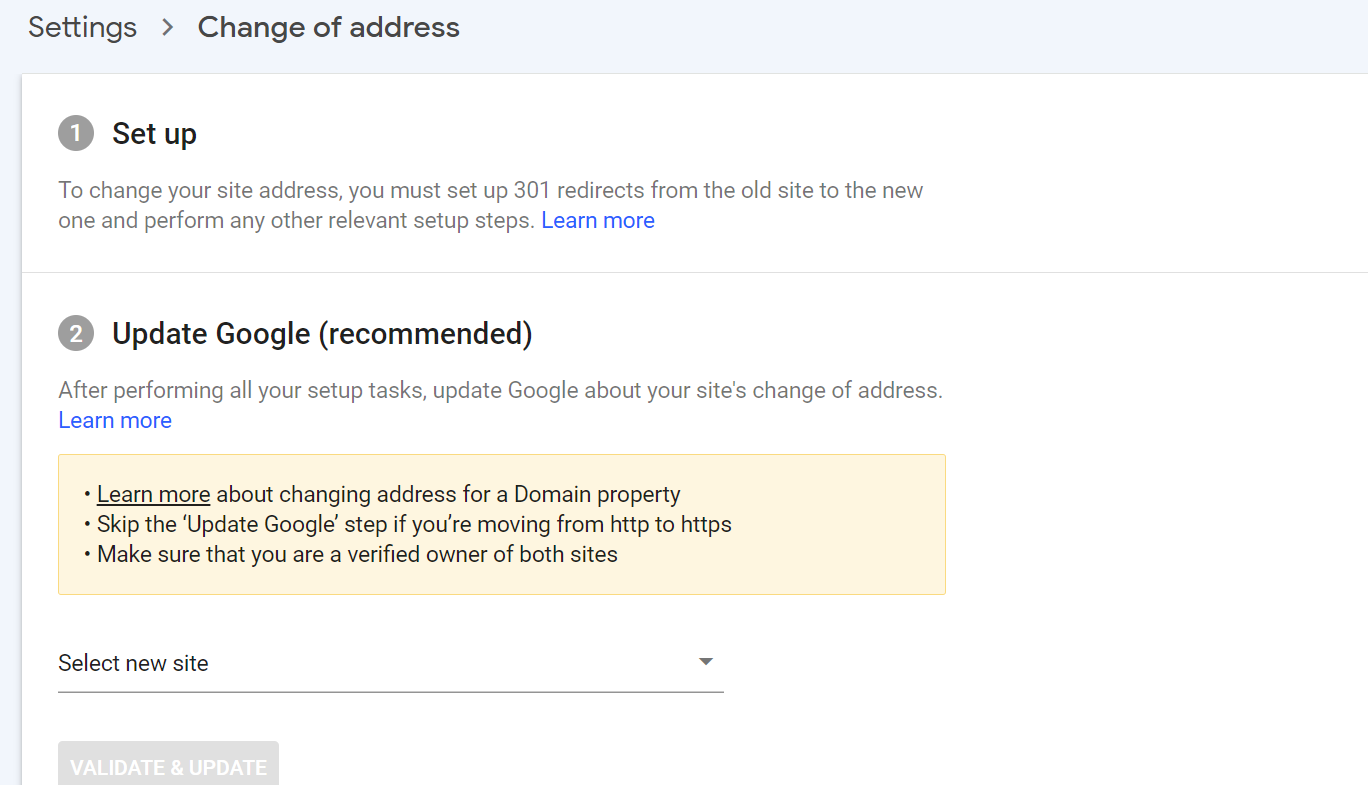
Once the request is submitted, google will eventually drop the old URLs from their index and start picking up the new URLs. However, it is still important to make sure that the 301s are added properly.
10. Add new sitemaps to GSC
Once the new site is live, you should add the new sitemaps to GSC. This will help google discover the new URLs and start indexing them.
11. Post launch crawls
Finally, the site is now live and it’s time to do the post-launch crawls. Once again, you can crawl using your preferred SEO tools. At this point, you should compare the data from post-launch to the data you had before the launch and the dev site crawl. If there’s no significant difference in the benchmark data, then migration was a success. However, if there’s a significant difference, you need to investigate where the problem is and fix it.
12. Crawl the old URLs using Screaming Frog
Take the list of all old URLs, the same list used to map the 301 redirects, and use screaming frog list mode to crawl them. Enable “always follow redirects” in the advanced configuration settings. This will allow the crawler to follow the redirects until the final target regardless of the crawl depth.
Ideally, all the URLs should return a 301 status and the URL they have been redirected to. If any of them return a 200 status, then they need to be redirected as soon as possible. Similarly, if any return a 404 status, they need to be redirected as well.
13. Annotate GA with the migration date
Finally, you should add an annotation in google analytics for the date the migration happened. This will help you monitor the effect of the migration as well as diagnose any traffic loss as a result of the migration.
14. Monitor rankings and traffic
Finally, you should monitor the traffic and rankings for any keywords you’re tracking. For the traffic, keep an eye on the top traffic pages from the old website. If the traffic to these pages is normal or increasing, then you have nothing to worry about. On the other hand, if the traffic declines sharply, you need to isolate the pages with traffic drops and identify why there is a drop. The first thing you should do is check whether the 301 redirect is working. If it is, then look at whether the content on the new page is different from what was on the old site. In most cases, it’s the 301 not working or the content was changed.
Conclusion
Although website migrations are complex and tedious, they are sometimes inevitable. In such cases, being well prepared and following the steps outlined in this article will help minimise the risks associated with migrating a website. The risks are less for smaller websites because there are fewer pages to begin with.
However, the risks are greater for larger websites with thousands of pages. In such a case, it’s better to talk to an expert to help plan and implement the migration successfully. At Autify, we have dealt with website migrations for both small and large websites. Contact us today for more information about our website migration service.
Read More Blogs

How can e-commerce companies reduce their carbon footprint?
With an estimated 62 million UK e-commerce users in 2025 alone, and an

14 Social Media Strategies for E-commerce
The intent of social media has evolved since Instagram first came onto the

Ecommerce Keyword Research: A Guide for Beginners
Ecommerce keyword research is the process of finding the most relevant search
connect
Let’s Get to Work
Want to get your business noticed? We can’t wait to see how we can support you. Get in touch today and let’s get to work!
Get Started